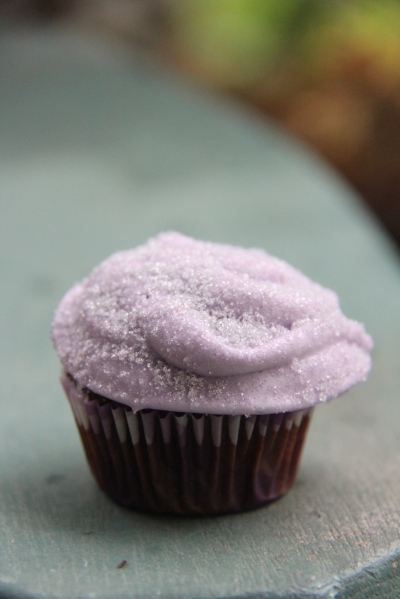
Sparkle Dipped Vanilla Frosted Chocolate Cupcakes
After I finished all the decorating I took it out to be photographed like a celebrity.
The story before the cupcakes..
I actually got this idea days, perhaps a week or two, after I bought my cake ingredients. I didn't really know exactly what I wanted to do except bake mini cupcakes. They were so adorable when I saw them! So I bought em..
And so that brings me to today. The day in which I make a huge mess in the kitchen, stare at the mess, get back to baking, take em out of the oven and start decorating. My favourite part by the way. Oh yeah, that reminds me. I couldn't find any icing bags at the Dollarama I went to so I am just going to use a plastic sandwich bag I already have at home. Does pretty much the same thing, I think.We'll let's hope.
Alright, let us begin.
First things first. If you haven't done so, make sure to clean a section of your counter top that you plan on working on. This is going to give you peace of mind while you mix, stir and bake. You'll be able to have enough room to place all your ingredients and to easily grab them later on.
Good. You got that done. Now I can tell you about the first thing you should make BEFORE you start on these cupcakes. It's the SPARKLE SUGAR! You need to make your cupcakes dazzle and this is how you do it.
The process.
The Sparkle Sugar Recipe
It's very easy to make. Here's all that you need:
Sugar (however much you think you will use)
Food colouring (your choice)
Tin foil
Baking sheet
Plastic sandwich bag
In your plastic sandwich bag, pour in your sugar. Next, choose your desired colour and add to sugar. You may also choose to mix colours (that's what I did). Once you added your colour, close your bag and using your fingers mix and massage (lol) the sugar crystals and colouring together. This should take about 2 minutes. Next, pour your mixture onto your tin foiled baking sheet. I baked it in a trough method. I was afraid it would melt if it was spread thinly.
Preheat oven to 250 degrees. Place your sugar mixture in the oven for about 4 minutes but always keep an eye on them. It can take sometimes much longer than 4 minutes. Be the judge. You don't want them to burn! Once you notice the texture starts to look glittery, take it out of the oven. Using a sifter, sift your sparkle sugar through into a bowl. And now you're done.
Let's now move onto the incredibly easy cake...box!
I used and followed the instructions on the cake box. In my defense, this is a blog about using things from the dollar store! It's okay to use eggs (which are not available at the dollar store) that you have at home. The most important thing is that you have the cake mixture.
The uh...icing.
That was horrendous. I bought it from Dollarama. Don't get me wrong, it was delicious. It was the icing design that didn't go as planned. It's not terrible (as you can see in the picture) but it could have been executed a lot better. I think my mistake was not filling up the bag enough and not cutting the right sized slit.
To make your icing you just...I'm just kidding. Just buy it. I tinted mine with food colouring I already had at home. Mixed it up with a spoon to blend the colours together (mine were 2 parts red/blue). It makes purple. Once that was finished, I used my small plastic sandwich bag and filled it halfway with my icing. Using scissors, I cut a slit on the bottom corner. Now just squeeze onto your cupcake. Make it pretty, though! Don't make my mistake..
My last thoughts..
This way my very first post on The Dollar Store Girl blog. Why I decided to do something so time consuming and at times, frustrating, as my first post? I don't know. Okay, maybe it was because I wanted to take nice pictures of glittery cupcakes. Glitter is pretty.
I thank you for visiting this blog and reading through my post/content. It means the world to me. I hope that I have taught you something new OR at the very least, humored you!
I hope you have a nice day! And good mental health.


